Introduction
This guide is an in-depth introduction to RAMN and how to use it. It can be used to gain knowledge about automotive systems and prepare for events such as automotive Capture The Flag (CTF) events. Check the Quick Start Guide first to get an overview.
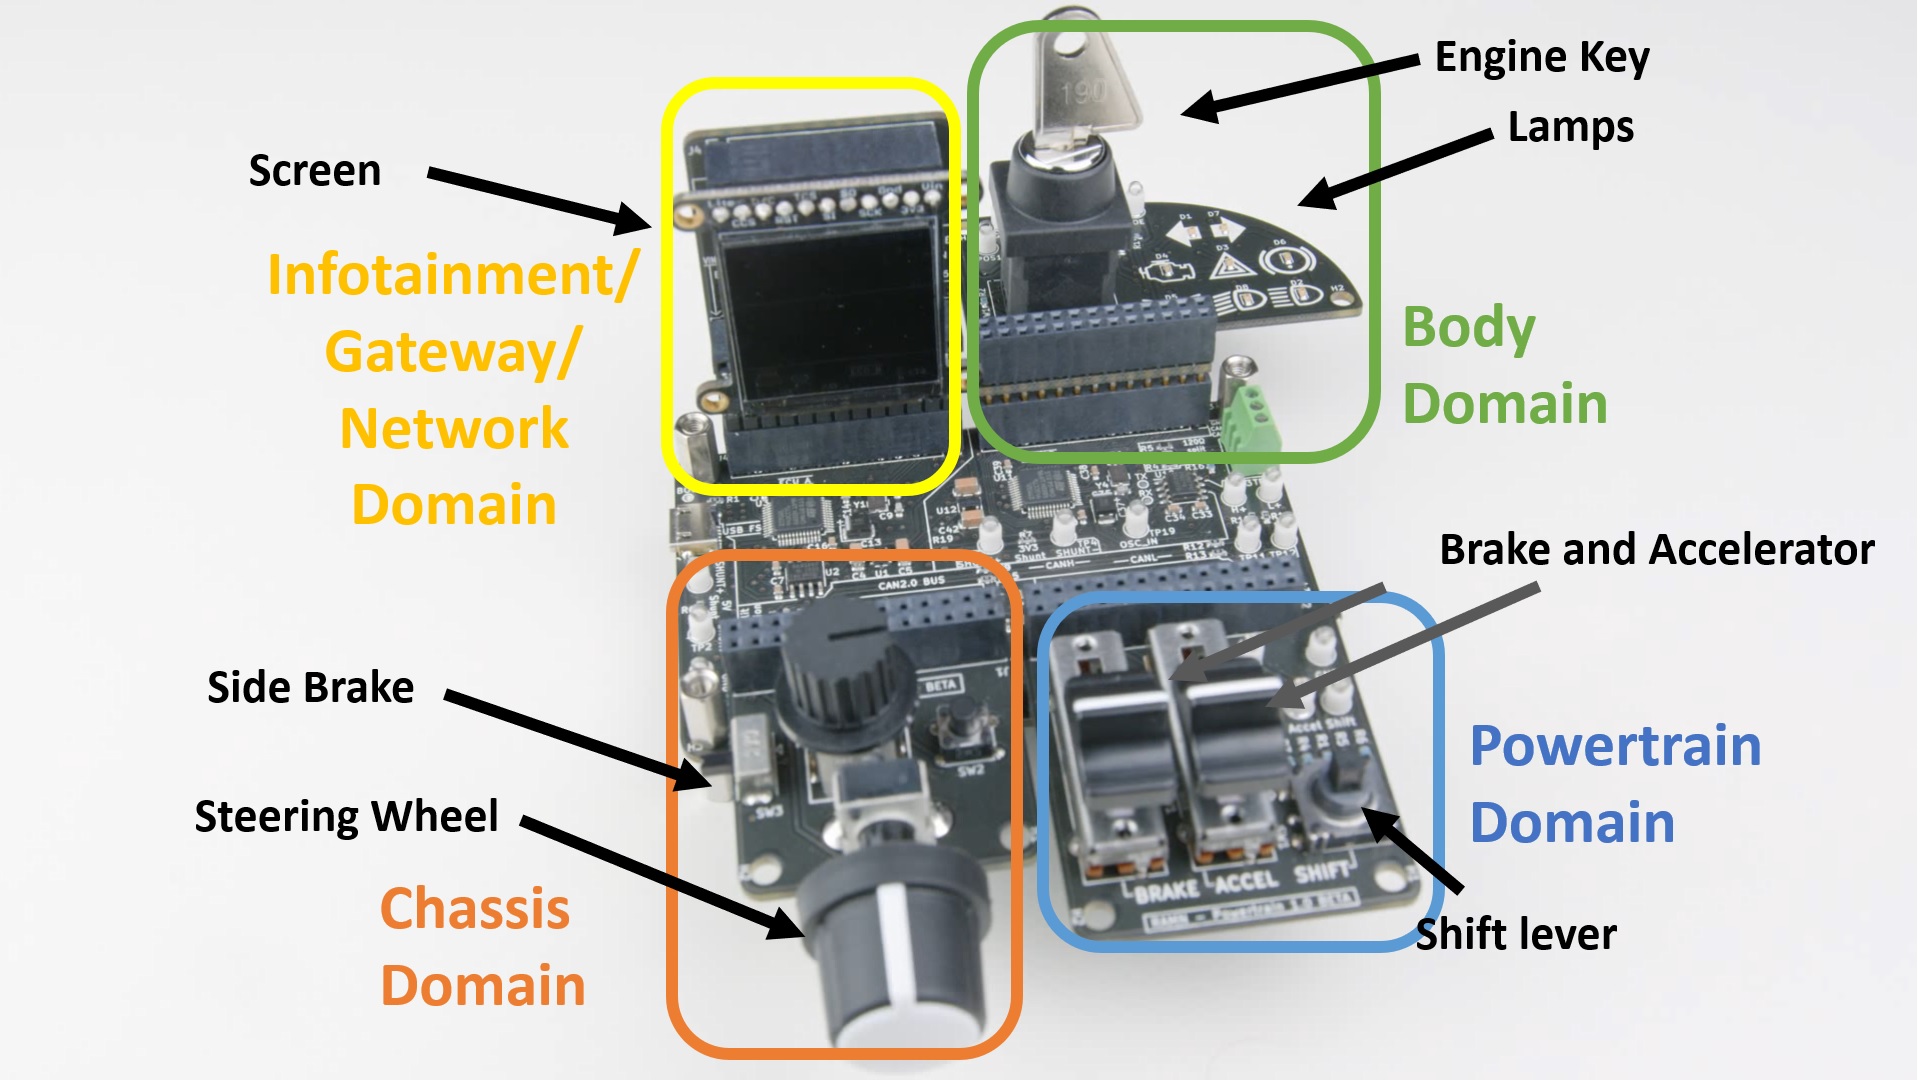
Modern automotive networks typically consist of several Electronic Control Units (ECUs) connected to a common network, using various communication protocols such as Controller Area Network (CAN), CAN with Flexible Data Rate (CAN FD), and Local Interconnect Network (LIN). RAMN is a set of simple Printed Circuit Boards (PCBs) that emulate such an automotive network, with four ECUs connected to a common CAN FD bus. Although not as complex as a real vehicle, it can be used as a platform to easily learn about automotive systems and experiment with them.
RAMN Hardware
RAMN consists of a “main board” and “expansions”. Expansions are not strictly required, but can be useful to implement physical interactions. RAMN has four ECUs: ECU A, ECU B, ECU C, and ECU D. Each ECU can be identified on the main board by looking at the PCB markings.
The hardware design files of RAMN are available on GitHub. Details about the hardware can be found in the Hardware section.
The caps of the Lighting switch and Steering potentiometer may fall off during rough handling - be sure not to lose them. Be also careful with the screen, which is rather fragile.
RAMN Software
Each ECU relies on an STM32L5 microcontroller (either STM32L552 or STM32L562) for its operations. The STM32L552/562 reference manual is available here.
The source code of RAMN is also available on GitHub. Details about the software can be found in the Firmware section.
The source code is common for all ECUs, only preprocessor variables differentiate ECUs (TARGET_ECUA to TARGET_ECUD, defined in ramn_config.h). The source code can be compiled for all ECUs at once using the build scripts, which require that you first install STM32CubeIDE.
ECUs can be flashed using one of three interfaces (See Firmware Flashing). The STM32 Embedded bootloader interface is the fastest and easiest to use, and only requires a USB connection to reflash all ECUs.
If you want to debug the firmware, you will need a JTAG debugger such as the ST-LINK/V2.
ECU features
ECU A features a USB port and can act as a USB to CAN/CAN FD adapter (“slcan” adapter). Other ECUs feature sensors and actuators and act as simple ECUs. Connecting RAMN over USB to your computer is therefore equivalent to owning a USB to CAN adapter and connecting it to the OBD-II port of a vehicle with three ECUs.
ECU B, C, and D each have a periodic task that reads the status of physical controls, broadcasts their status on the CAN bus, and updates the status of their outputs (such as an LCD screen or LEDs).
RAMN can be connected to the driving simulator CARLA using the scripts in the CARLA folder. This makes it possible to observe how the behavior of a vehicle in a driving simulator correlates with messages transmitted by different ECUs on a physical CAN bus.
ECUs support standard diagnostic features, that can be accessed for example using the Unified Diagnostic Services (UDS):
ECU A accepts requests at ID 0x7e0 and answers at 0x7e8.
ECU B accepts requests at ID 0x7e1 and answers at 0x7e9.
ECU C accepts requests at ID 0x7e2 and answers at 0x7ea.
ECU D accepts requests at ID 0x7e3 and answers at 0x7eb.
Analysis Environment
You only need to power the main board over USB (with or without expansions) to get an active CAN bus. You can follow any guide and use any tool you want to connect to the CAN bus. If you do not have any, you can follow this guide, which uses RAMN’s built-in slcan adapter (so all you need is a RAMN board).
To follow this guide entirely, you will need to install the following tools:
A terminal emulator program such as TeraTerm or Putty. We recommend that you download and install TeraTerm. This will allow you to send serial commands to ECU A directly over USB.
A Python environment for Windows, which can be downloaded here. Make sure that you check “Add Python to environment variables” (or PATH). This will allow you to execute RAMN’s Python scripts directly on Windows. If you plan to use CARLA, make sure you use a supported version (see Installing CARLA).
STM32CubeProgrammer and STM32CubeIDE, only necessary if you want to modify the source code and/or reflash the ECUs. You may also want to install STM32CubeMX to use source code template generation features.
A Linux virtual machine (or native). This will allow you to use open source tools such as can-utils to interact with RAMN’s CAN bus, and to execute RAMN’s scripts. Follow the guide below for that purpose.
Preparing a Linux Machine with can-utils
Windows
On Windows, we recommend that you install VirtualBox and use a Linux distribution image. A common choice by car enthusiasts is Kali Linux[1].
Unzip the 7z image using 7zip.
Double-click the vbox file to open it with VirtualBox. If you encounter USB issues, open Settings > USB and try USB 2.0 or USB 3.0 (virtual machine must be powered off).
Login with username kali (password kali).
From here, you should be able to follow the Linux instructions below.
Linux
Open a terminal window (e.g., right-click the desktop and click “Open Terminal here”).
Type the following commands to install can-utils:
$ sudo apt-get update
$ sudo apt-get install can-utils